- Automating Alexa with SmartLife, SmartThings and smart devices
- Adding Backup Camera to my 2013 F15 Sync1 System
- ForScan Mods that work on my F150
- Fixing a fridge led light
- Fixing and installing a new in-ground pool light
- Creating Tree Baffles to keep Squirrels out of them
Mac's How to Tips
Saturday, February 19, 2022
New tips now on my You-Tube Channel
Sunday, March 14, 2021
Adding and Review of the Boss Backup camera for 2003 Jeep Wrangler JK
Hi All,
Thought I would share how I added a backup camera to my Jeep Wrangler JK.
What I used:
Here is a video of the Review and Install
Happy Round Trip!
Here are just some of the pics I took during the install but the video contains more detail.
Monday, February 22, 2021
Forscan Mods that work on my 2013 F150 Crew Cab
Here are the features I enabled or disabled on my 2013 F150
Chimes, Buzzers and Alarms – I hate them so turned them all off
- Key in the ignition
- Door Open
- Seatbelt
- Panic Button
Daytime Running Lights – Fog / Parking Lights turn on automatically when truck is put into drive
Bambi Mode – Fog lights stay on with High beams
Blinkers set to seven to allow more time for lane change / quick turns
Previously I added a backup camera on a Sync1 4” screen
You can watch the video below of the ForScan Mods
ForScan Settings
Key/Reverse/Overspeed/Door ChimesSeatbelt Reminder off
Panic Button/Alarm off
726-22-01 xx*x-xx *=0
Daytime Running Lights
Bambi Mode – BCM 726-11-01 xxx*-xxxx-xx *=2 Enable fog lights with HB
Blinker count set to seven SCCM 724-01-01 xxxx-x*xx-xx *=F 7 flash & OUC True
Saturday, February 6, 2021
Adding a Backup Camera to a 2013 Ford F150 Sync1 4" Screen
I am back again with another "Macs How To Tip". This time it is about upgrading my 2013 F150 with a backup camera. There are many videos and forums I spent countless hours researching but none seem to work, or be about other vehicle types and years. I found most of the material being about 2015 vehicles and later with Sync2-4 systems!
You can watch the video here!
Here is what you need:
Forescan for windowsInstalling the Camera on the Tailgate:
Carefully mount the backup camera. I just snugged the bolts hand tight until I knew everything was connected and working. Just in case I needed to disassemble the tailgate camera for some reason.
Accessing the Sync 1 Display:
- Remove the three airbag screws by dropping out the glove box. Then you can pop out the airbag to reveal the top screw holding in the air condition panel.
- Pop open the right air condition panel. This will reveal several more screws that hold in the display.
- Remove the top dash board cover, remove the two screws holding in the panel. Remove the cover. There are two screws holding the main panel.
- Pop open the left air-con panel. You cant remove it but lift it open to remove the last two screws holding in the main panel.
Programing the Truck So it Knows There is a Camera
Now I have a backup camera on my F150! The nice thing is it stays on once in drive until you reach 5mph. Then it switches back to it's normal view!
Wednesday, December 16, 2020
Restoring a Sessions Mission Wall Clock - Early 1900's
This was my grandfathers clock and hung in his wall for many many years. As a small child, I remember him winding the clock every Sunday and the sound of the BONG on the hour and a softer at the bottom.
It also was in my moms kitchen after that but could not stay running for over a few minutes. It has been silent for over 30 years.
Since I have inherited it, I though I would try to restore it and get it running again.
After trying to clean it with alcohol, bending the verge wires to see if I could align the tick-tocks - I came to the conclusion I needed to do a total rebuild.
Here is a video showing how I rebuilt the clock and get it running again.
Here are the links to the parts I purchased:
The video doesn't cover everything I tried - just what worked. Below are all the pictures and more from the video.
Friday, May 22, 2020
Controlling an Elderly Parents TV Remotely
If this sounds familiar, read on!
What you Need:
- RM Pro Plus ($25) or newer model
- Any Smart Phone or Iphone to load the IHC setup and remote control app
- Spare router or WiFi phone hot-spot setup for the same settings as your parents (so you need to know the SSID and password of the facility and it must support 2.4Ghz frequency)
- The make and model of the TV and set top box
- The provider and plan of the TV/cable service channel lineup
Setup and Programming:
1) Setup of the local hot-spot or router to simulate the remote network:
2) Configuring the RM Pro:


2) Programming the Remotes in the IHC App:
A) Creating Channels:
B) Creating Scenes - Part 1 for Automation:
3) Connecting to Alexa and Creating Routines:
A) Enable the IHC smart skill on the Alexa Device.
A) Creating a Routine.
Friday, March 20, 2020
Setup Echo Show 5 to Video Conference with an Elderly Parent
I needed a way to do just this and researched many options, fire TV, Facebook Portal, cell phone accessories, and Alexa devices. I choose the Echo Show 5 as that could help with more issues than just video conferencing down the road.
Issues Faced With Setting Up the Echo Show 5: (don't worry - I found work arounds!)
- Having access to parents cell phone to receive text authentications - Alexa App, Voice, etc.
- Having access to parents email - again for authentication
- Not all setup can be done on the Show itself - the communications portion of the show - the main feature I bought it for - can only be setup within the Alexa app
- Supported phone - Alexa app only works on Android 6+ and iPhones. Most parents probably don't have a new android phone, or just have a flip voice phone with simple text!
- Setting up on WiFi once shipped to parent.
What you need:
- Compatible phone for Alexa App - use yours to log in with a new Amazon account. I used my old Android 6 phone and just setup on wi-fi
- Parents email account - or setup a new gmail account
- New Amazon account if they don't already have one. (prime is not required but you can add them to your prime account).
- Google voice account - setup to receive text message to the linked email account - use this to authenticate the phone use with amazon. You could use your Google number but if you want other to be able to call them using amazon devices, you need a separate number. I linked this temporally to my wife's cell phone as google voice sends a text verification.
- Hotspot or spare WiFi router with the same SSID/Password as parent's WiFi, or someone to set that up. I had someone local setup the Echo Show 5 to the facilities WiFi network.
Steps to setup:
Setting up the echo show:
One important step NOT to do - DO NOT import contacts in the Alexa app unless you have the parents phone - or you setup a spare phone with the parents credentials!!!! If you allow this on your phone - Alexa imports all your contacts and you can not delete them from the app. You have to call google support to reset the service.
- Get access to the parents email account or create a new gmail.
- Get Amazon account info - or setup a new Amazon account using the email from step 1.
- Setup the Alexa Show with the information requested during the setup sequence. If you setup a hotspot, or sub-router with the same Wi-Fi credentials as the parents network, enter those to connect the Alexa Show. Here is a good overview of the setup options.
Setting up Alexa App for Communications:
- If you don't have the parents phone, or it's not compatible with the Alexa App, use yours, or an older phone to download the Alexa app. If you plan on using the calling features - you will need a new google voice account to authenticate the Alexa app. I used my old android 6 phone and setup on WiFi. Since I already had a goggle voice number, I used my wife's cell number to setup the Google voice account as it also sends an authentication text to provision the service, as you can only tie one cell phone number to google voice.
- If you are setting up a spare phone, download the contacts on to the duplicate phone and setup with the same credentials as the parents phone. (Not sure this works on iPhone as I used Android and just sync'ed the contacts)
- Download the Alexa App on the phone and enter the Amazon credentials previously setup. If you are using your phone, DO NOT import contacts in the Alexa app/ If it is a clone of the parents phone, import the contacts.
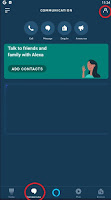
- To setup the communications, click on the chat icon at the bottom of the phone.
- To access the contacts, or to manually add contact, click on the person icon at the top right of the phone.
- To allow "Drop-In" you must edit each contact that you want to allow, and enable the "Drop-In" permission. If you do not see the Drop-In permission, that contact does not have an Alexa app or device, or the number is not tied to their Alexa account.

Summary
UPDATE: To control the TV Remotely - check this out!
Tuesday, November 26, 2019
Wiring a Zongen ATV 250CC
So I decided to rebuild it.
Parts:
- A new carb - VM26 - $26
- New wiring harness $50 - there are many to choose from and based on the looks, I ordered WonVon Complete Electric Stator Engine Wiring Harness THIS COMES WITH NO DIRECTIONS! - details below
- New front break cable - $11
This was a one for one swap. It fit perfectly. The only difference is the choke assembly. This has a handle that clicks, where I just have a choke cable to adjust on the old version. I think I can just swap out the assembly and be good to go. I find that if I take off the seat, it is very easy to adjust the choke.
Wiring Harness:
 The harness came with no connection diagram or instructions and was a bit differen. It also had some different connectors for the lights and Stator. Was planning on just reconnecting the old Stator but since the connections were different, decided to change that out. Details on Stator replacement below. Here is a diagram I made based on my current connections. For the lights, I reused the light connectors from the old harness and connected the blue, white and green wires in the front of the new harness.
Replacing the Stator:
 This was not an easy task and took me a few hours. I could not find any good instructions so mostly figured this out from looking at many other types of replacement.
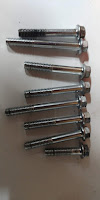
Step 1 - Remove the Eight bolts around the Stator compartment. Starting with the top center bolt and working counter clockwise (to the left), remove the bolts. There are different sizes so keep them in order. And then repeat from the top when putting them back in. You may have to remove you stand and gear shift as well.
Step 2: On the same side - remove the three bolts on the starter casing. Remove the casing - be careful to note the gear, it may fall out. The larger gear is on top or the closest to the outside.
Step 3 - Remove the one bolt on the top left in the starter casing where the gear sticks through. On the other side of the ATV, remove the long screw bolts holding the starter to the casing from the .
Step 4 - Using a small tack hammer - lightly tap on the Stator housing to dislodge it and break the seal. You maybe able to just pull it off without tapping, but mine was stuck on there.
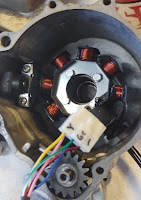
 Step 5 - Remove the old Stator. Cut the cable - remove the three bolts on the Stator. Remove the two screws holding in the pulse sensor. This was difficult as they would not come out and I was afraid of stripping the Philips screws. I soaked them in bolt release lubricant for several hours. I eventually had to heat the outside of the casing with a torch before they would break free. Use anti-seize compound on the bolts before putting them back in.
 Step 6 - Install new Stator - Note the color and the position of the wires to the connector. I marked them with a Sharpe.
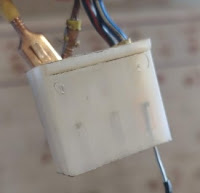
Using a small paper clip or piece of hard wire, slide it up in to the connector to push the slide pin down. This will release the pin, and allow you to remove the wire from the connector. After all the wires are removed from the connector, slide the wires from the inside of the case out through the cable hole. Re-seat the runner grommet and the three bolts to the Stator, Put the anti-seize compound on the pulse sensor bolts and install them. Reset the wires back in to the connector as noted.
Re-install the casing in the reverse order. Pay special attention to how the wires are routed up from the engine. Not getting them tucked in good and hidden will prevent the casing covers from aligning correctly.
Still no Start????
After all this and getting the harness connected and all the parts installed, the bike still would not start. I did not have a spark - why????? There are two gotchas here!
1) Mid way in the harness, you will find two wires that have matching barrel connectors, join them as this connects 12 volts to your switch. See the wiring diagram.
2) The kill switch on the new multi-switch is a slider. To kill the engine, you slide the switch to either side. However, this is a locking slide, you must push in the button to release the kill. After several hours of trouble shooting this and finding this video on how to diagnose the Stator and CDI, I figured this out. It came down to the one pin on the CDI being grounded so know that was shorted some where. I took the harness apart and found the joined wire going back to the multi-switch and by accident, pushed the button in and noticed the change in ohms on the CDI. After that - started right up!
Connecting the Lights:
Since the connectors on the front are different. I used the old light connectors and soldered them to the Blue/White connector, and then use the green wire for ground. Most the other wires on the front or spare connectors as noted in the diagram. I think some could be used for the back break light that I do not have connected - but the running light works.
Hope this helps someone else - and happy trails!
tim


